![[a羅針盤]](image/pukiwiki.png "[a羅針盤]")
|
Postfix + Dovecotのインストール
概要: † メールサーバーの主な機能はメールの送信とメールの受信ですが、ここではPVSのサーバーに既にインストールされている送信メールサーバー(SMTPサーバー)としてPostfix、受信メールサーバー(POP/IMAPサーバー)(POP/IMAP参照)としてDovecotを構成します。初期状態ではこれらは導入されていますが、未構成で動いていません。 ここでは、以下の順番で段階を踏んで設定します。
目次 †前提: †1. Postfixについて †1.1 Postfix †Postfix(ポストフィックス)はsendmailに代わるメール転送エージェント(MTA:Mail Transport Agent)として開発されたソフトウェアで、sendmailとの 互換性が高く、安全、メンテナンスが容易、速い、などの特徴を兼ね備えた メールサーバソフトです。そのため最近はLinuxの一部のディストリビューションで標準のMTAとして採用されています。 1.2 設定ファイル †Postfixの設定は、ここでは以下の4ファイルを編集します。
Dovecotの設定は、ここでは以下の3ファイルを編集します。 1.3 Postfix サポートコマンド †
2.Postfix †2.1 Postfixインストール †VPSの場合Postfixはインストール済ですが、インストールされていない場合は以下のコマンドでインストールします。 # yum -y install postfix 2.2 master.cf † Postfixメールシステムはユーザによって呼び出される少数のクライアントコマンドと、バックグラウンドで走る多数のサービスによって実 装されています。
Postfixサー ビスはデーモンプロセスによって実装されています。これらはmasterプロセスの制御下でバックグラウンドで走ります。 # vi /etc/postfix/master.cf # # Postfix master process configuration file. For details on the format # of the file, see the master(5) manual page (command: "man 5 master"). # # Do not forget to execute "postfix reload" after editing this file. # # ========================================================================== # service type private unpriv chroot wakeup maxproc command + args # (yes) (yes) (yes) (never) (100) # ========================================================================== # 以下はsmtpの設定のセクションです。 smtp inet n - n - - smtpd submission inet n - n - - smtpd ← サブミッション対策のためコメントを外す # -o smtpd_tls_security_level=encrypt ↓ -oの前のブランクは削除しないこと。 -o smtpd_sasl_auth_enable=yes ← SASL通信のためコメントを外す。 -o smtpd_client_restrictions=permit_sasl_authenticated,reject ← client_restrictionsのためコメントを外す # -o milter_macro_daemon_name=ORIGINATING # 以下はsmtpsの設定のセクションです。smtpsを使用する場合設定します。 #smtps inet n - n - - smtpd # -o smtpd_tls_wrappermode=yes # -o smtpd_sasl_auth_enable=yes # -o smtpd_client_restrictions=permit_sasl_authenticated,reject # -o milter_macro_daemon_name=ORIGINATING #628 inet n - n - - qmqpd pickup fifo n - n 60 1 pickup cleanup unix n - n - 0 cleanup qmgr fifo n - n 300 1 qmgr #qmgr fifo n - n 300 1 oqmgr tlsmgr unix - - n 1000? 1 tlsmgr rewrite unix - - n - - trivial-rewrite bounce unix - - n - 0 bounce defer unix - - n - 0 bounce trace unix - - n - 0 bounce verify unix - - n - 1 verify flush unix n - n 1000? 0 flush proxymap unix - - n - - proxymap proxywrite unix - - n - 1 proxymap smtp unix - - n - - smtp # When relaying mail as backup MX, disable fallback_relay to avoid MX loops relay unix - - n - - smtp -o smtp_fallback_relay= # -o smtp_helo_timeout=5 -o smtp_connect_timeout=5 showq unix n - n - - showq error unix - - n - - error retry unix - - n - - error discard unix - - n - - discard local unix - n n - - local virtual unix - n n - - virtual lmtp unix - - n - - lmtp anvil unix - - n - 1 anvil scache unix - - n - 1 scache # # ==================================================================== # Interfaces to non-Postfix software. Be sure to examine the manual # pages of the non-Postfix software to find out what options it wants. # # Many of the following services use the Postfix pipe(8) delivery # agent. See the pipe(8) man page for information about ${recipient} # and other message envelope options. # ==================================================================== # # maildrop. See the Postfix MAILDROP_README file for details. # Also specify in main.cf: maildrop_destination_recipient_limit=1 # #maildrop unix - n n - - pipe # flags=DRhu user=vmail argv=/usr/local/bin/maildrop -d ${recipient} # # ==================================================================== # # The Cyrus deliver program has changed incompatibly, multiple times. # #old-cyrus unix - n n - - pipe # flags=R user=cyrus argv=/usr/lib/cyrus-imapd/deliver -e -m ${extension} ${user} # # ==================================================================== # # Cyrus 2.1.5 (Amos Gouaux) # Also specify in main.cf: cyrus_destination_recipient_limit=1 # #cyrus unix - n n - - pipe # user=cyrus argv=/usr/lib/cyrus-imapd/deliver -e -r ${sender} -m ${extension} ${user} # # ==================================================================== # # See the Postfix UUCP_README file for configuration details. # #uucp unix - n n - - pipe # flags=Fqhu user=uucp argv=uux -r -n -z -a$sender - $nexthop!rmail ($recipient) # # ==================================================================== # # Other external delivery methods. # #ifmail unix - n n - - pipe # flags=F user=ftn argv=/usr/lib/ifmail/ifmail -r $nexthop ($recipient) # #bsmtp unix - n n - - pipe # flags=Fq. user=bsmtp argv=/usr/local/sbin/bsmtp -f $sender $nexthop $recipient # #scalemail-backend unix - n n - 2 pipe # flags=R user=scalemail argv=/usr/lib/scalemail/bin/scalemail-store # ${nexthop} ${user} ${extension} # #mailman unix - n n - - pipe # flags=FR user=list argv=/usr/lib/mailman/bin/postfix-to-mailman.py # ${nexthop} ${user} OP25B対策 †多くのISP(Internet Service Provider、プロバイダー)は迷惑メール対策として、外部のサーバーに25番ポートで接続できないようにする、いわゆるOP25B(Outbound Port25 Blocking)を行っています。これはISP自身のメールサーバー以外にはポート番号25を使わせないというISPの運用方針です。その場合は、25番ポートでメールサーバーに接続できません。
25番ポートの代わりにsubmissionポートとして指定されている587番ポートで接続できるように設定する必要があります。 2.3 main.cfの基本設定 † main.cfの設定パラメータの詳細はPostfix main.cf ファイルフォーマットを参考にしました。 # vi /etc/postfix/main.cf # Global Postfix configuration file. This file lists only a subset
# of all parameters. For the syntax, and for a complete parameter
# list, see the postconf(5) manual page (command: "man 5 postconf").
#
# For common configuration examples, see BASIC_CONFIGURATION_README
# and STANDARD_CONFIGURATION_README. To find these documents, use
# the command "postconf html_directory readme_directory", or go to
# http://www.postfix.org/.
#
# For best results, change no more than 2-3 parameters at a time,
# and test if Postfix still works after every change.
:
(中略)
:
# ホスト名とドメイン名の設定。
# INTERNET HOST AND DOMAIN NAMES
#
# The myhostname parameter specifies the internet hostname of this
# mail system. The default is to use the fully-qualified domain name
# from gethostname(). $myhostname is used as a default value for many
# other configuration parameters.
#
#myhostname = host.domain.tld
#myhostname = virtual.domain.tld
↑ myhostnameをデフォルトから変更する場合設定します。ここではデフォルトの
ままなので設定しません。フォーマットは 'ホスト名.ドメイン名' です。
# The mydomain parameter specifies the local internet domain name.
# The default is to use $myhostname minus the first component.
# $mydomain is used as a default value for many other configuration
# parameters.
#
#mydomain = domain.tld
# ドメイン名の設定。
mydomain = acompass.net ← 追加。取得したドメイン名を設定します。
# 外行きのメールに使うドメイン名の設定。
# SENDING MAIL
#
# The myorigin parameter specifies the domain that locally-posted
# mail appears to come from. The default is to append $myhostname,
# which is fine for small sites. If you run a domain with multiple
# machines, you should (1) change this to $mydomain and (2) set up
# a domain-wide alias database that aliases each user to
# user@that.users.mailhost.
#
# For the sake of consistency between sender and recipient addresses,
# myorigin also specifies the default domain name that is appended
# to recipient addresses that have no @domain part.
#
#myorigin = $myhostname
#myorigin = $mydomain
↑ コメントアウトのまま。複数のメールサーバーを使用する場合設定。
# 受信するメールのIPアドレスの設定。
# RECEIVING MAIL
# The inet_interfaces parameter specifies the network interface
# addresses that this mail system receives mail on. By default,
# the software claims all active interfaces on the machine. The
# parameter also controls delivery of mail to user@[ip.address].
#
# See also the proxy_interfaces parameter, for network addresses that
# are forwarded to us via a proxy or network address translator.
#
# Note: you need to stop/start Postfix when this parameter changes.
#
inet_interfaces = all ← 外部からのメールを受信するためコメントを外す
#inet_interfaces = $myhostname
#inet_interfaces = $myhostname, localhost
#inet_interfaces = localhost ← コメントアウト
# Enable IPv4, and IPv6 if supported
inet_protocols = all
↓ ipv4だけを使用する場合は以下のように修正
inet_protocols = ipv4
:
(中略)
:
# The mydestination parameter specifies the list of domains that this
# machine considers itself the final destination for.
:
(中略)
:
# 受信したメールの宛先の制限の設定。正しくない宛先を拒否する。
# See also below, section "REJECTING MAIL FOR UNKNOWN LOCAL USERS".
#
#mydestination = $myhostname, localhost.$mydomain, localhost ← コメントアウト
mydestination = $myhostname, localhost.$mydomain, localhost, $mydomain ← コメントを外す
#mydestination = $myhostname, localhost.$mydomain, localhost, $mydomain,
# mail.$mydomain, www.$mydomain, ftp.$mydomain
:
(中略)
:
# TRUST AND RELAY CONTROL
# The mynetworks parameter specifies the list of "trusted" SMTP
# clients that have more privileges than "strangers".
:
(中略)
:
#
# In particular, "trusted" SMTP clients are allowed to relay mail
# through Postfix. See the smtpd_recipient_restrictions parameter
# in postconf(5).
#
# You can specify the list of "trusted" network addresses by hand
# or you can let Postfix do it for you (which is the default).
#
# By default (mynetworks_style = subnet), Postfix "trusts" SMTP
# clients in the same IP subnetworks as the local machine.
# On Linux, this does works correctly only with interfaces specified
# with the "ifconfig" command.
#
# Specify "mynetworks_style = class" when Postfix should "trust" SMTP
# clients in the same IP class A/B/C networks as the local machine.
# Don't do this with a dialup site - it would cause Postfix to "trust"
# your entire provider's network. Instead, specify an explicit
# mynetworks list by hand, as described below.
#
# Specify "mynetworks_style = host" when Postfix should "trust"
# only the local machine.
#
# マシンが信頼する全てのネットワーク。ここではVPSサーバー1台だけなのでhostを設定する。
#mynetworks_style = class
#mynetworks_style = subnet
mynetworks_style = host ← コメントを外す
# Alternatively, you can specify the mynetworks list by hand, in
# which case Postfix ignores the mynetworks_style setting.
#
# Specify an explicit list of network/netmask patterns, where the
# mask specifies the number of bits in the network part of a host
# address.
#
# You can also specify the absolute pathname of a pattern file instead
# of listing the patterns here. Specify type:table for table-based lookups
# (the value on the table right-hand side is not used).
#
#mynetworks = 168.100.189.0/28, 127.0.0.0/8
#mynetworks = $config_directory/mynetworks
#mynetworks = hash:/etc/postfix/network_table
mynetworks = 127.0.0.0/8 ← 追加
# The relay_domains parameter restricts what destinations this system will
# relay mail to. See the smtpd_recipient_restrictions description in
# postconf(5) for detailed information.
:
(中略)
:
#
# NOTE: Postfix will not automatically forward mail for domains that
# list this system as their primary or backup MX host. See the
# permit_mx_backup restriction description in postconf(5).
#
# リモートの配送先の設定。
#relay_domains = $mydestination
↑ コメントアウトのまま。デフォルトが$mydestinationなので、
転送先を$mydestination以外に追加・変更する場合設定します。
:
(中略)
:
# DELIVERY TO MAILBOX
#
# The home_mailbox parameter specifies the optional pathname of a
# mailbox file relative to a user's home directory. The default
# mailbox file is /var/spool/mail/user or /var/mail/user. Specify
# "Maildir/" for qmail-style delivery (the / is required).
#
#home_mailbox = Mailbox
# メールボックスディレクトリーの形式の設定
# Mailbox形式では/var/spool/mail配下に ユーザ名で1ファイルにメールが溜まり続けていきますが
# Maildir形式では各ユーザのホームディレクトリに1通づつメールが溜まっていきます。
# ここでは主流のMaildir形式とします。
home_mailbox = Maildir/ ← コメントを外す '/'に注意
:
(中略)
:
# JUNK MAIL CONTROLS
#
# The controls listed here are only a very small subset. The file
# SMTPD_ACCESS_README provides an overview.
# The header_checks parameter specifies an optional table with patterns
# that each logical message header is matched against, including
# headers that span multiple physical lines.
#
# By default, these patterns also apply to MIME headers and to the
# headers of attached messages. With older Postfix versions, MIME and
# attached message headers were treated as body text.
#
# For details, see "man header_checks".
#
# メールのヘッダーまたはボディー部分でパターン設定ファイルでパターンに一致したメールを拒否します。
# 設定ファイルはそれぞれheader_checks、body_checksです。後述
header_checks = regexp:/etc/postfix/header_checks ← コメントを外す
body_checks = regexp:/etc/postfix/body_checks ← 追加
:
(中略)
:
# SHOW SOFTWARE VERSION OR NOT
#
# The smtpd_banner parameter specifies the text that follows the 220
# code in the SMTP server's greeting banner. Some people like to see
# the mail version advertised. By default, Postfix shows no version.
#
# You MUST specify $myhostname at the start of the text. That is an
# RFC requirement. Postfix itself does not care.
#
#smtpd_banner = $myhostname ESMTP $mail_name
#smtpd_banner = $myhostname ESMTP $mail_name ($mail_version)
# Not display Mail Server Soft at access by telnet,etc.
smtpd_banner = $myhostname ESMTP
↑ 追加。telnetなどでアクセスされた場合の表示内容。メールサーバーソフト名を非表示にします。
:
(中略)
:
### 以下を最後に追加 ###
### SASL設定 ###
smtpd_sasl_auth_enable = yes
smtpd_sasl_local_domain = $mydomain
broken_sasl_auth_clients = yes
mailbox_size_limit = 209715200 ←メールボックスサイズを200MB=200*1024*1024に設定。Defaultは50MB
message_size_limit = 5242880 ←受信メールサイズを5MB=5*1024*1024に制限
2.4 main.cfのセキュリティーとSpam対策 †Postfixだけで有効なSpam対策ができる訳ではありませんが、Postfixで可能な最低限の設定をしておきます。
制限を強めれば本来受け取りたいメールまで拒否しますし、制限を弱めればSpamメールが多く届くことになるので、
メールサーバの運用ポリシーにより適時設定してください。 EXPN/VRFYコマンドの拒否 †EXPN、VRFYコマンドによりアカウントの有無を確認できないように、EXPNやVRFYコマンドを無効にします。 disable_vrfy_command = yes HELO コマンドの要求 †SMTPセッションの初めに HELOコマンドを要求して、HELOコマンドを送信しないスパムメールを止めます。 smtpd_helo_required = yes smtpd_*****_restrictionsで接続の可/否を設定 †smtpd_*****_restrictionsでSMTPサーバがそれぞれのセクションでの接続可/否を設定できます。 主なセクションは以下の4つです。
smtpd_client_restrictions †Postfix SMTPサーバがクライアントからSMTP接続の要求を受けた際に適用されるアクセス制限です。 smtpd_client_restrictions =
permit_mynetworks,
reject_non_fqdn_sender,
reject_non_fqdn_recipient,
reject_unknown_client,
reject_rbl_client all.rbl.jp,
reject_rbl_client zen.spamhaus.org,
reject_rbl_client bl.spamcop.net,
check_client_access hash:/etc/postfix/access, ← 特定のメールアドレス等で指定する場合に設定
permit
パラメータの説明 : permit_mynetworks :クライアントIPが$mynetworks(自ネットワーク)に属していた
場合は要求を許可します。
reject_non_fqdn_sender :MAIL FROM アドレスが RFC で要求されているような完全修飾
ドメイン形式ではない場合に、要求を拒否します。
reject_non_fqdn_recipient:RCPT TO アドレスが RFC で要求されているような完全修飾
ドメイン形式ではない場合に、要求を拒否します。
reject_unknown_client :クライアントIPが DNS に PTR レコードを持たない場合
(逆引きができないホスト)等の要求を拒否します。
check_client_access : accessファイルの指定に従って、要求の可/否を判定する場合。
reject_rbl_client :RBLサイトに登録されているブラックサイトを拒否します。
上記は例なので、上記以外の設定を検討してください。
RBL(DNSBL)は、IPアドレスやホスト名をDNSに問い合わせることで、
スパムや問題のあるホストであるかを判定してくれるブラックリスト機能です。
DNSBLはいくつかボランティアで運営されている物がありますが、中には、多少ルールか厳しく、
本来受け取りたいメールもSpam判定を受けてしまう事もあり得ます。
運営自体が停止された場合は、メールが配送されない障害も発生します。
また、判定をいちいちDNSに問い合わせるのでメール処理の速度が遅くなるので、
設定するサイト数を少なくするとか、多量のメールを処理する場合はRSYNCにより
RBLファイルをサーバー内にダウンロードして使用する方法を検討してください。
そのため、reject_rbl_clientを利用する場合は注意が必要です。
RBLは世界中に様々存在しており、以下はRBLサイトの例です。(2013/8/12時点)
all.rbl.jp (virus.rbl.jp, short.rbl.jpを統合したもの。日本のサイトhttp://www.rbl.jp/ )
zen.spamhaus.org (sbl.spamhaus.org,xbl.spamhaus.org,
pbl.spamhaus.orgを統合したもの。http://www.spamhaus.org/ )
bl.spamcop.net (http://spamcop.net/bl.shtml )
cbl.abuseat.org (http://cbl.abuseat.org/ )
dnsbl-1.uceprotect.net (http://www.uceprotect.net/ )
dnsbl-2.uceprotect.net
dnsbl-3.uceprotect.net
psbl.surriel.com (Passive Spam Block List http://psbl.org/ )
korea.services.net (韓国のサイト http://korea.services.net/ )
http://www.rbl.jp/ckdb/に、排除したい相手のIPを入れてみると、
SPAMCOP,SPAMHAUS,RBL.JPの中でどのRBLに登録があるか調べることができます。
permit : 上記以外は中継を許可
accessファイルの作成方法 †ファイル名accessは任意で各restrictionsの中で指定したファイル名で作成します。従って各restrictionsで異なるファイル名にして各restrictions毎に設定することも可能です。 # vi /etc/postfix/access 1.2.3 REJECT 1.2.3.4 OK # postmap /etc/postfix/access ← ハッシュ化する。 # ls /etc/postfix/access.db ← できたか確認する。 smtpd_helo_restrictions †Postfix SMTPサーバがSMTP HELOコマンドで適用するオプションの制限です。 smtpd_helo_restrictions =
permit_mynetworks,
check_helo_access hash:/etc/postfix/access, ← 特定のメールアドレス等で指定する場合に設定
reject_invalid_hostname,
reject_non_fqdn_hostname,
reject_unknown_hostname,
permit
パラメータの説明 : permit_mynetworks : 自信のネットワークからは許可します。
reject_invalid_hostname : HELOまたはEHLOホスト名の文法が不正な場合、要求を拒否します。
reject_non_fqdn_hostname : HELOまたはEHLOホスト名の文法がRFCで要求されているような
完全修飾ドメイン形式ではない場合に(FQDN 形式でない場合に)、要求を拒否します。
reject_unknown_hostname : HELOまたはEHLOホスト名のDNS AレコードまたはMXレコードが
ない場合に、要求を拒否します。
permit : 上記以外は中継を許可します。
smtpd_sender_restrictions †Postfix SMTP サーバがMAIL FROMコマンドで適用するオプションの制限です。 smtpd_sender_restrictions =
permit_mynetworks,
check_sender_access hash:/etc/postfix/access, ← 特定のメールアドレス等で指定する場合に設定
reject_unknown_sender_domain,
reject_non_fqdn_sender
パラメータの説明 : permit_mynetworks : 自信のネットワークからは許可します。
check_sender_access hash:/etc/postfix/access : accessファイルの指定に従って、
要求の可/否を判定します。
reject_unknown_sender_domain : MAIL FROMアドレスにDNS AレコードまたはMXレコードが
ない場合に、要求を拒否します。
reject_non_fqdn_sender : MAIL FROMアドレスがRFCで要求されているような完全修飾ドメイン形式で
はない場合に(FQDN 形式でない場合に)、要求を拒否します。
smtpd_recipient_restrictions †Postfix SMTPサーバがRCPT TOコマンドで適用するアクセス制限です。 smtpd_recipient_restrictions =
permit_mynetworks,
permit_sasl_authenticated,
permit_auth_destination,
reject
パラメータの説明 : permit_mynetworks :クライアントIPが$mynetworks(自ネットワーク)に
属していた場合は要求を許可します。
permit_sasl_authenticated:SMTP_AUTHに認証されたクライアントを許可します。
↑ この設定はsmtpd_client_restrictionsでも設定可能です。
permit_auth_destination :以下のアドレスにマッチするものは許可します。
$inet_interfaces
$mydestination
$virtual_alias_domains
$virtual_mailbox_domains
以下のドメイン・サブドメインは許可します。
$relay_domains
reject : 上記以外は全て拒否します。
main.cfへの記述 †上記の内容をmain.cfへ追記します。上記main.cfのセキュリティーとSpam対策を以下にまとめておきますがあくまでも説明のための例なので、サーバーの使用方法に応じて適切に修正して下さい。 disable_vrfy_command = yes
smtpd_helo_required = yes
smtpd_client_restrictions =
permit_mynetworks,
reject_non_fqdn_sender,
reject_non_fqdn_recipient,
reject_unknown_client,
reject_rbl_client all.rbl.jp,
reject_rbl_client zen.spamhaus.org,
reject_rbl_client bl.spamcop.net,
check_client_access hash:/etc/postfix/access,
permit
smtpd_helo_restrictions =
permit_mynetworks,
check_helo_access hash:/etc/postfix/access,
reject_invalid_hostname,
reject_non_fqdn_hostname,
reject_unknown_hostname,
permit
smtpd_sender_restrictions =
permit_mynetworks,
check_sender_access hash:/etc/postfix/access,
reject_unknown_sender_domain,
reject_non_fqdn_sender
smtpd_recipient_restrictions =
    permit_mynetworks,
    permit_sasl_authenticated,
    permit_auth_destination,
    reject
2.5 checksファイル設定 †
2.6 Maildir形式メールボックス作成 †各アカウントのホームディレクトリー下にMaildir形式のディレクトリーを作成します。
rootのMaildirを作成します。他のアカウントのMaildirディレクトリはテンプレートディレクトリーの設定後のアカウントは自動的作成されます。 # cd /home/アカウントのディレクトリー
# mkdir -p Maildir/{new,cur,tmp}
# chmod -R 700 Maildir/
2.7 SMTP-Auth設定 †設定ファイルを確認します。 # cat /etc/sasl2/smtpd.conf
pwcheck_method: saslauthd ← saslauthdになっているのを確認します。
mech_list: plain login
2.8 /etc/servicesへのプロトコル・ポート設定 †/etc/services内のsmtp,pop3,imap,submissionを確認します。 # vi /etc/services smtp 25/tcp mail pop3 110/tcp pop-3 imap 143/tcp imap2 submission 587/tcp msa この4種類が登録されていることを確認します。なければ追記します。 2.9 Postfix起動 †
2.10 ポート25番と587番のOPEN †ネットワーク上でTCP/IPの25番と587番ポートが開いていること。(サーバー、クライアント、ルーターなどのファイヤーウォールやセキュリティー設定で OPENされていること。) 3.Dovecot †3.1 Dovecotのインストール †VPSの場合Dovecotはインストール済ですが、インストールされていない場合は以下のコマンドでインストールします。 # yum -y install dovecot 3.2 dovecot.confの設定 †# cd /etc/dovecot # vi dovecot.conf ## Dovecot configuration file # If you're in a hurry, see http://wiki.dovecot.org/QuickConfiguration # "doveconf -n" command gives a clean output of the changed settings. Use it # instead of copy&pasting files when posting to the Dovecot mailing list. # '#' character and everything after it is treated as comments. Extra spaces # and tabs are ignored. If you want to use either of these explicitly, put the # value inside quotes, eg.: key = "# char and trailing whitespace " # Default values are shown for each setting, it's not required to uncomment # those. These are exceptions to this though: No sections (e.g. namespace {}) # or plugin settings are added by default, they're listed only as examples. # Paths are also just examples with the real defaults being based on configure # options. The paths listed here are for configure --prefix=/usr # --sysconfdir=/etc --localstatedir=/var # Protocols we want to be serving. #protocols = imap pop3 lmtp ↓ 次のように変更してコメントを外す。 protocols = imap pop3 # A comma separated list of IPs or hosts where to listen in for connections. # "*" listens in all IPv4 interfaces, "::" listens in all IPv6 interfaces. # If you want to specify non-default ports or anything more complex, # edit conf.d/master.conf. #listen = *, :: ↓ ipv4だけを使用する場合は以下のように修正 listen = * # Base directory where to store runtime data. #base_dir = /var/run/dovecot/ # Greeting message for clients. #login_greeting = Dovecot ready. # Sepace separated list of login access check sockets (e.g. tcpwrap) #login_access_sockets = # Show more verbose process titles (in ps). Currently shows user name and # IP address. Useful for seeing who are actually using the IMAP processes # (eg. shared mailboxes or if same uid is used for multiple accounts). #verbose_proctitle = no # Should all processes be killed when Dovecot master process shuts down. # Setting this to "no" means that Dovecot can be upgraded without # forcing existing client connections to close (although that could also be # a problem if the upgrade is e.g. because of a security fix). #shutdown_clients = yes # If non-zero, run mail commands via this many connections to doveadm server, # instead of running them directly in the same process. #doveadm_worker_count = 0 # UNIX socket or host:port used for connecting to doveadm server #doveadm_socket_path = doveadm-server ## ## Dictionary server settings ## # Dictionary can be used to store key=value lists. This is used by several # plugins. The dictionary can be accessed either directly or though a # dictionary server. The following dict block maps dictionary names to URIs # when the server is used. These can then be referenced using URIs in format # "proxy::<name>". dict { #quota = mysql:/etc/dovecot/dovecot-dict-sql.conf.ext #expire = sqlite:/etc/dovecot/dovecot-dict-sql.conf.ext } # Most of the actual configuration gets included below. The filenames are # first sorted by their ASCII value and parsed in that order. The 00-prefixes # in filenames are intended to make it easier to understand the ordering. !include conf.d/*.conf # A config file can also tried to be included without giving an error if # it's not found: #!include_try /etc/dovecot/local.conf 3.3 10-auth.confの設定 †# cd /etc/dovecot/conf.d # vi 10-auth.conf ## ## Authentication processes ## # Disable LOGIN command and all other plaintext authentications unless # SSL/TLS is used (LOGINDISABLED capability). Note that if the remote IP # matches the local IP (ie. you're connecting from the same computer), the # connection is considered secure and plaintext authentication is allowed. #disable_plaintext_auth = yes ↓ 次のようにnoに変更してコメントを外す。 disable_plaintext_auth = no # Authentication cache size (e.g. 10M). 0 means it's disabled. Note that # bsdauth, PAM and vpopmail require cache_key to be set for caching to be used. #auth_cache_size = 0 # Time to live for cached data. After TTL expires the cached record is no # longer used, *except* if the main database lookup returns internal failure. # We also try to handle password changes automatically: If user's previous # authentication was successful, but this one wasn't, the cache isn't used. # For now this works only with plaintext authentication. #auth_cache_ttl = 1 hour # TTL for negative hits (user not found, password mismatch). # 0 disables caching them completely. #auth_cache_negative_ttl = 1 hour # Space separated list of realms for SASL authentication mechanisms that need # them. You can leave it empty if you don't want to support multiple realms. # Many clients simply use the first one listed here, so keep the default realm # first. #auth_realms = # Default realm/domain to use if none was specified. This is used for both # SASL realms and appending @domain to username in plaintext logins. #auth_default_realm = # List of allowed characters in username. If the user-given username contains # a character not listed in here, the login automatically fails. This is just # an extra check to make sure user can't exploit any potential quote escaping # vulnerabilities with SQL/LDAP databases. If you want to allow all characters, # set this value to empty. #auth_username_chars = abcdefghijklmnopqrstuvwxyzABCDEFGHIJKLMNOPQRSTUVWXYZ01234567890.-_@ # Username character translations before it's looked up from databases. The # value contains series of from -> to characters. For example "#@/@" means # that '#' and '/' characters are translated to '@'. #auth_username_translation = # Username formatting before it's looked up from databases. You can use # the standard variables here, eg. %Lu would lowercase the username, %n would # drop away the domain if it was given, or "%n-AT-%d" would change the '@' into # "-AT-". This translation is done after auth_username_translation changes. #auth_username_format = # If you want to allow master users to log in by specifying the master # username within the normal username string (ie. not using SASL mechanism's # support for it), you can specify the separator character here. The format # is then <username><separator><master username>. UW-IMAP uses "*" as the # separator, so that could be a good choice. #auth_master_user_separator = # Username to use for users logging in with ANONYMOUS SASL mechanism #auth_anonymous_username = anonymous # Maximum number of dovecot-auth worker processes. They're used to execute # blocking passdb and userdb queries (eg. MySQL and PAM). They're # automatically created and destroyed as needed. #auth_worker_max_count = 30 # Host name to use in GSSAPI principal names. The default is to use the # name returned by gethostname(). Use "$ALL" to allow all keytab entries. #auth_gssapi_hostname = # Kerberos keytab to use for the GSSAPI mechanism. Will use the system # default (usually /etc/krb5.keytab) if not specified. #auth_krb5_keytab = # Do NTLM and GSS-SPNEGO authentication using Samba's winbind daemon and # ntlm_auth helper. <doc/wiki/Authentication/Mechanisms/Winbind.txt> #auth_use_winbind = no # Path for Samba's ntlm_auth helper binary. #auth_winbind_helper_path = /usr/bin/ntlm_auth # Time to delay before replying to failed authentications. #auth_failure_delay = 2 secs # Require a valid SSL client certificate or the authentication fails. #auth_ssl_require_client_cert = no # Take the username from client's SSL certificate, using # X509_NAME_get_text_by_NID() which returns the subject's DN's # CommonName. #auth_ssl_username_from_cert = no # Space separated list of wanted authentication mechanisms: # plain login digest-md5 cram-md5 ntlm rpa apop anonymous gssapi otp skey # gss-spnego # NOTE: See also disable_plaintext_auth setting. auth_mechanisms = plain ↓ 次のように変更する。 auth_mechanisms = plain login ## ## Password and user databases ## # # Password database is used to verify user's password (and nothing more). # You can have multiple passdbs and userdbs. This is useful if you want to # allow both system users (/etc/passwd) and virtual users to login without # duplicating the system users into virtual database. # # <doc/wiki/PasswordDatabase.txt> # # User database specifies where mails are located and what user/group IDs # own them. For single-UID configuration use "static" userdb. # # <doc/wiki/UserDatabase.txt> #!include auth-deny.conf.ext #!include auth-master.conf.ext !include auth-system.conf.ext #!include auth-sql.conf.ext #!include auth-ldap.conf.ext #!include auth-passwdfile.conf.ext #!include auth-checkpassword.conf.ext #!include auth-vpopmail.conf.ext #!include auth-static.conf.ext 3.4 10-mail.confの設定 †# cd /etc/dovecot/conf.d # vi 10-mail.conf :
(前略)
:
# See doc/wiki/Variables.txt for full list. Some examples:
#
# mail_location = maildir:~/Maildir
# mail_location = mbox:~/mail:INBOX=/var/mail/%u
# mail_location = mbox:/var/mail/%d/%1n/%n:INDEX=/var/indexes/%d/%1n/%n
#
# <doc/wiki/MailLocation.txt>
#
#mail_location =
↓ 次のように変更してコメントを外す。
mail_location = maildir:~/Maildir
# If you need to set multiple mailbox locations or want to change default
# namespace settings, you can do it by defining namespace sections.
#
:
(後略)
:
3.5 Dovecot起動 †
3.6 ポート110番(POPの場合)または143番(IMAPの場合)のOPEN †ネットワーク上でTCP/IPの110番と143番ポートが開いていること。(サーバー、クライアント、ルーターなどのファイヤーウォールやセキュリティー設定で OPENされていること。) 4.Mutt †Maildir 形式のメールに対応しているテキストベースのMUA、Muttをインストールします。 4.1 Muttのインストール †# yum -y install mutt ========================================================================================== Package Arch Version Repository Size ========================================================================================== Installing: mutt x86_64 5:1.5.20-2.20091214hg736b6a.el6_1.1 base 1.2 M Installing for dependencies: tokyocabinet x86_64 1.4.33-6.el6 base 428 k urlview x86_64 0.9-7.el6 base 24 k Transaction Summary ========================================================================================== Install 3 Package(s) 4.2 Muttの設定 †2.3 main.cfの基本設定の中のhome_mailboxの設定に従って以下のように設定します。 # vi /etc/Muttrc :
(前略)
:
# set folder="~/Mail"
↓ 次のように変更してコメントを外す。
set folder="~/Maildir"
#
# Name: folder
# Type: path
# Default: "~/Mail"
#
#
#
# Specifies the default location of your mailboxes. A ``+ or ``= at the
# beginning of a pathname will be expanded to the value of this
# variable. Note that if you change this variable (from the default)
# value you need to make sure that the assignment occurs before
# you use ``+ or ``= for any other variables since expansion takes place
# when handling the ``mailboxes'' command.
:
(中略)
:
# set mbox="~/mbox"
↓ 次のように変更してコメントを外す。
set mbox="~/Maildir"
#
# Name: mbox
# Type: path
# Default: "~/mbox"
#
#
# This specifies the folder into which read mail in your $spoolfile
# folder will be appended.
#
# Also see the $move variable.
#
#
# set mbox_type=mbox
↓ 次のように変更してコメントを外す。
set mbox_type=Maildir
#
# Name: mbox_type
# Type: folder magic
# Default: mbox
#
#
# The default mailbox type used when creating new folders. May be any of
# ``mbox'', ``MMDF'', ``MH'' and ``Maildir''. This is overridden by the
# -m command-line option.
:
(中略)
:
# set spoolfile=""
↓ 次のように変更してコメントを外す。
set spoolfile="~/Maildir"
#
# Name: spoolfile
# Type: path
# Default: ""
#
#
# If your spool mailbox is in a non-default place where Mutt cannot find
# it, you can specify its location with this variable. Mutt will
# initially set this variable to the value of the environment
# variable $MAIL or $MAILDIR if either is defined.
:
(後略)
:
4.3 /root/.muttrcの設定 †rootに送信されたメールをLocalのユーザーcentosuser(例)に転送している場合、root に "su -" したままメールの確認をしたいことがあるので、root の時 ユーザーcentosuser のメールボックスを読めるように.muttrcを設定します。 # vi /root/.muttrc set folder="~centosuser/Maildir" set mbox="~centosuser/Maildir" set spoolfile="~centosuser/Maildir" set from="root@acompass.net set realname="root" 注:mutt を '-x' オプションで起動すると UCB Mail 互換モードで 動作します。 4.4 muttの起動 †$ mutt ←コマンドを入力すると以下のように表示されます。 q:Quit d:Del u:Undel s:Save m:Mail r:Reply g:Group ?:Help 1 F Oct 10 To centosuser@loca (0.1K) Test 2 F Oct 13 To centosuser@acom (0.1K) Test 4.5 muttの使用方法 †
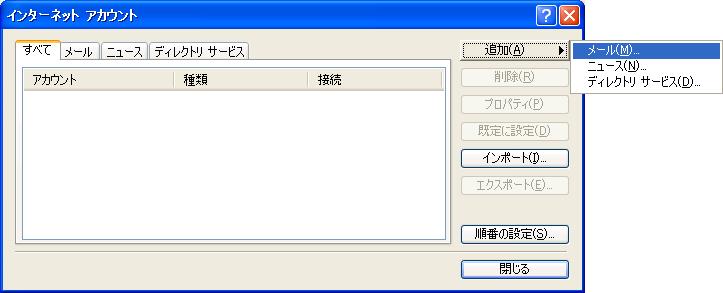
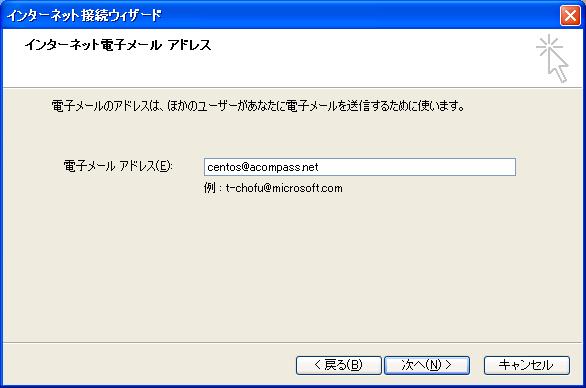
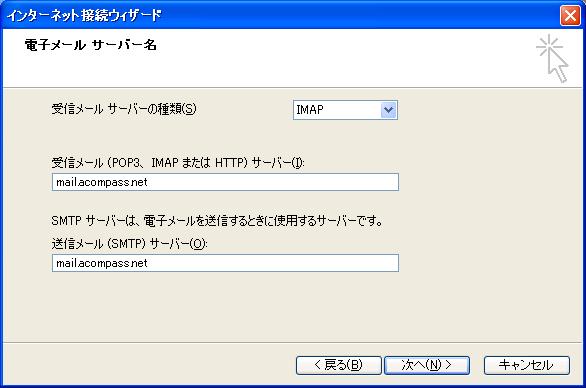
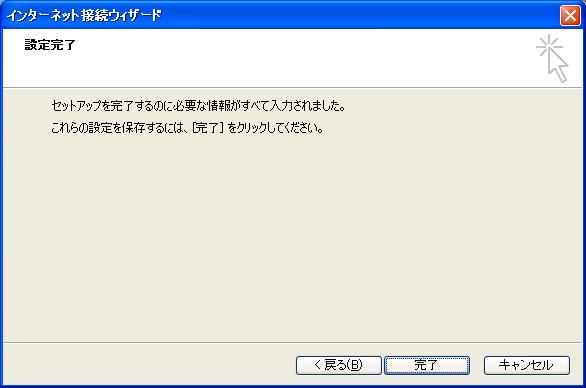
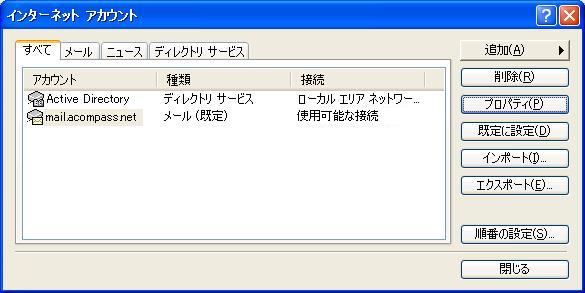
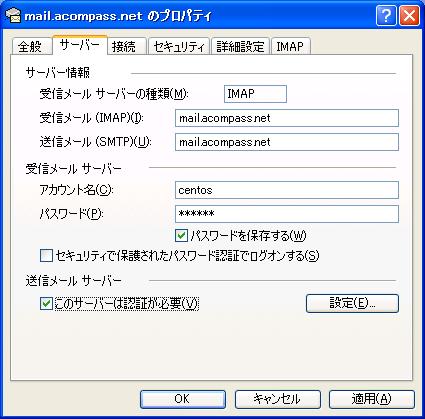
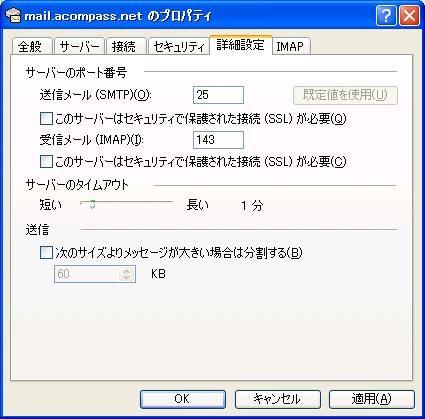
5.メールアカウント追加 †システムアカウント追加方法と同じですが、SSHによるリモート接続はできないようにする場合は以下のようにオプションに-s /sbin/nologinを設定します。 # useradd -s /sbin/nologin centos ← アカウント追加 # passwd centos ← パスワード設定 Changing password for user centos. New UNIX password: ← パスワード入力 Retype new UNIX password: ← パスワード確認 passwd: all authentication tokens updated successfully. 6.メールソフト設定(受信メールサーバーをIMAPにする場合) †自宅や会社等の複数拠点でメールを使用する場合で、メールをサーバに保存して管理する場合 (例:メールサーバーで受信したメールを会社でも自宅でもダウンロードして読む場合)、受信メールサーバーにIMAPを使用します。 ここでは、メールソフトとしてOutlook Expressの設定について説明します。
Last-modified: 2014-12-14 (日) 16:19:36 (3881d)
|